

I love hidden object games.
I believe they are a wonderful way to keep students engaged while learning / testing new vocabulary. Unfortunately there aren’t any French hidden object games (at least not for beginners / intermediate level classrooms) and not any that use specialised word families like the ones we love to use in the language classroom. So I decided to create my own hidden object games in French using Powerpoint. It is easy, fast, effective and you don’t need to be Powerpoint superheroes to make it happen!
If your students have their own laptops/ tablets with them during class,you will find that, apart from a great team activity, this hidden object game can also be used as a way to keep early-finishers busy and working on their laptops.
So, how we do it?
First of all, the
Game Objective:
Students have to find the hidden objects in the image based on the foreign language words provided next to game scene. When they find an object, they should click on it and the object moves next to the word describing it. The game is over when all hidden objects are found.
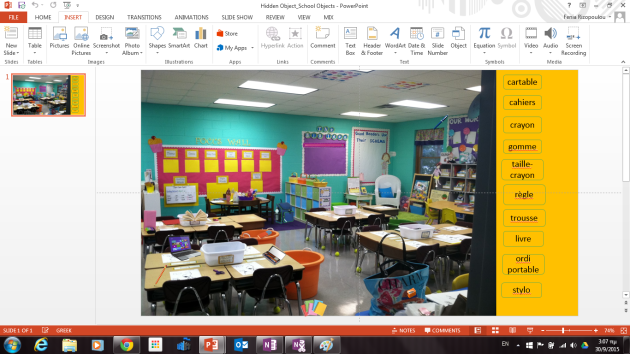
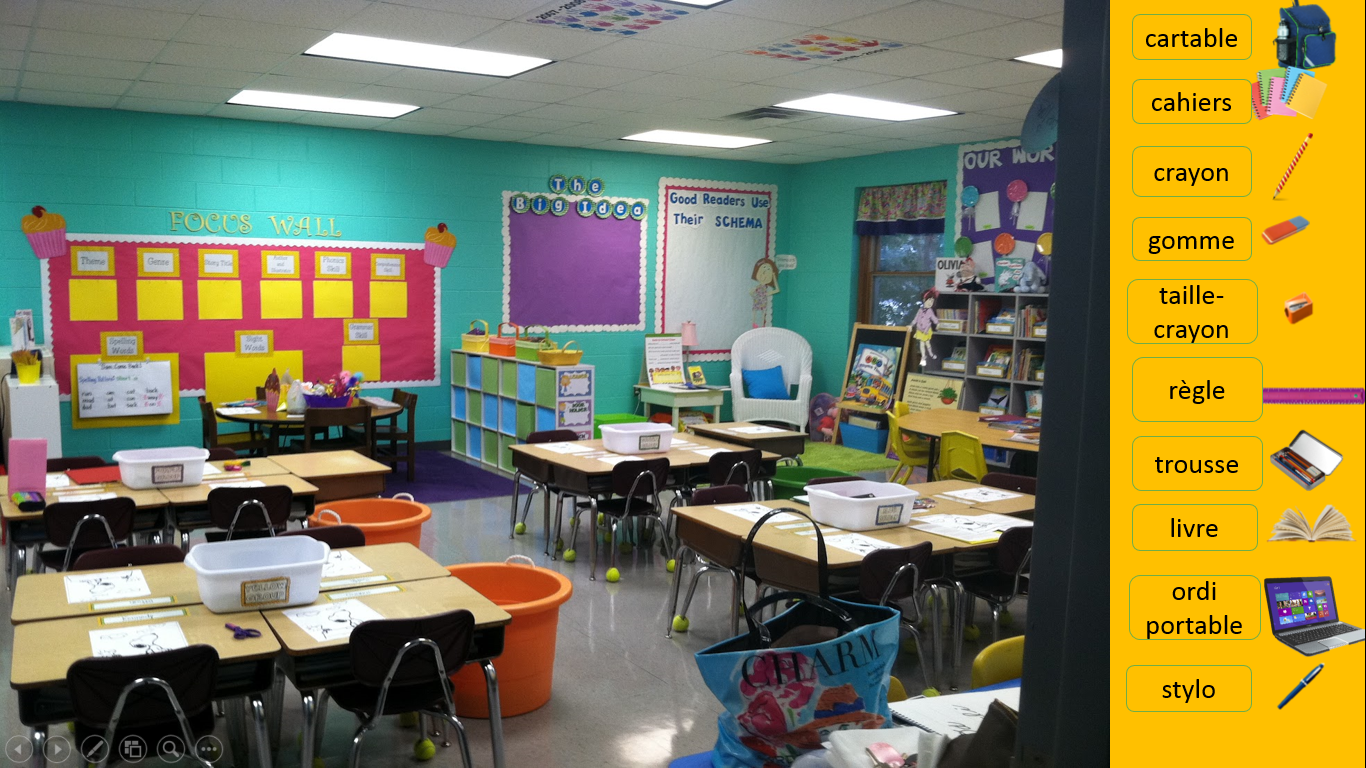
Today’s hidden object game has to do with school objects i.e. objects we use in classroom: books, pens, rulers, sharpeners etc.
First, let’s create the game schene: the ideal choise is to use a classroom as the background for my game.
- Open Powerpoint and Insert> Online picture.
- Search for something as “classroom” (in this case) and choose something colorful with many objects inside.


This is the 1st rule when working with hidden object games: Colorful and busy backgrounds!
Then, you decide which objects you are going to place in the picture. These are the words you want to teach or revise.
- Create a colorful list next to the picture: Design > Format Background > Solid Fill > Choose color (I chose Gold).
- Resize your background image to leave some space for your list to be placed on the right side of the image.
- Now the list: “Insert text” and write as a list the words you want to teach.
- You can also Insert>Shapes and choose a square shape to create nice “buttons” to place your words in. Just create one button and copy – paste it several times. You can also “Group” the button with the word to make them a unique body easier to move around: Format > Group > Ctrl + Click your text first and then the button shape.
- Now, insert the pictures of the objects that you want to teach using the same way as with the background: Insert> Online pictures.
You can also place pictures already saved in your computer.
- Resize them and drag wherever you ant in the picture.
- Sometimes, pictures come with a default background, so you may need to “Remove the Background” of the items you enter (Picture Tools > Format > Remove background) in order to integrate them better to the new background.
You can place them randomly but it is better to try to find places to “hide” your objects in your pictures, on/next to a similar colour part of your background image: we don’t want to make them too obvious and easy to be found!

Can you see the objects I put in this picture?

Now, it’s time to create the “game” part.
- We animate the objects using the “Motion Paths” from the Animations menu (you can decide the shape of the path you prefer). This way, we connect our images to the describing words with a motion and everytime we click on an object, it moves and “sits” next to the relevant word.
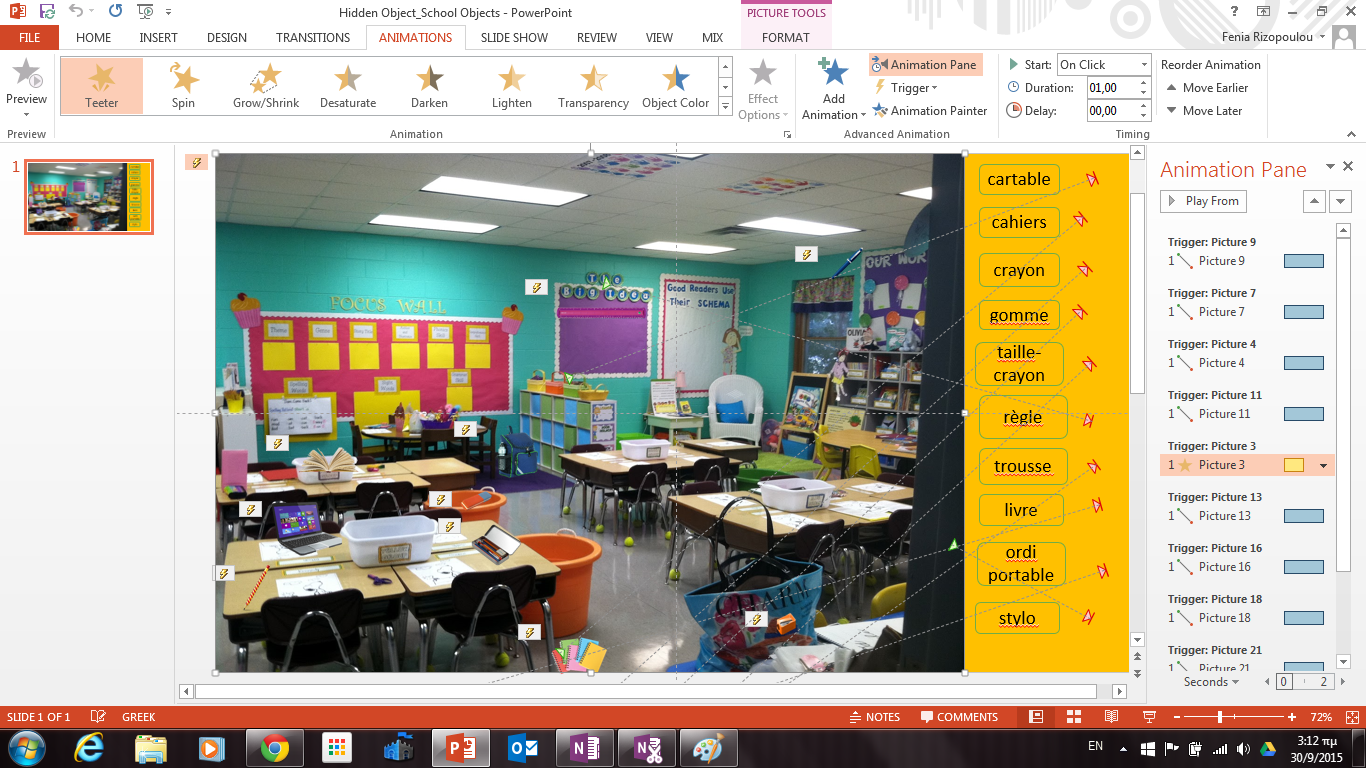
Remember to Trigger correctly: “On Click” of the designated image, the Animation triggers and your Object follows a path to be placed next to the appropriate word. If you manage to do this with one picture, you can then use the “Animation painter” to apply the same effect to all your pictures. Then you only need to customize the path towards the proper word for each item.
The only problem now is that if a student clicks accidentaly on the background of the slide and not on an object, the slide ends automatically (by default in Powerpoint). What you can do to prevent this is to animate also the background. I think that the best solution for that is to use the Animation “Teeter” with the background: that means that the background “shakes”, letting the student know that he clicked on the wrong thing. For this last animation remember to click “Rewind when done playing” on the “Effect Options” in order to make the background shake everytime the student accidentaly clicks on it.
Another idea is to add a “failure” sound on this effect.
You can find below my Powerpoint hidden object game and check how it is made. Hope you’ll like it. If you also teach School Objects this week, you can just edit the French words and add the words in the language that you teach!
I think it can also work well with more advanced levels if we want, for example, to focus on vocabulary that is useful and common but rarely taught in the classroom. I am working on that and there will be more in a future post!

